Ausmini
It is currently Wed Jun 25, 2025 4:31 am

All times are UTC + 10 hours


Post new topic Reply to topic  [ 7 posts ] 
Author Message
 Post subject: Adjusting HiLo’s
PostPosted: Thu Jul 06, 2023 1:34 pm 
Offline
848cc
848cc

Joined: Mon Apr 25, 2022 6:38 pm
Posts: 73
I had my van fitted with new HiLo’s before I picked it up, and at a local car show recently a mini owning friend looked underneath and said they have settled in and need raising a bit as the bump stops are bottomed out. He said there is a formula that tells you what height change each complete turn of the adjusting nut makes, but was not sure of it.
My questions are
1. Does anyone know this formula?
2. What is the ideal clearance between the bump stop and the suspension arm?

I have searched the forum but can’t find this question referenced previously.

Cheers jb


Top
 Profile  
 
 Post subject: Re: Adjusting HiLo’s
PostPosted: Thu Jul 06, 2023 1:50 pm 
Offline
1275cc
1275cc
User avatar

Joined: Sun Apr 29, 2012 1:19 pm
Posts: 4494
Location: Wollongong, NSW
The ratio is approx 4.5:1 - so if you raise the hilo 1mm you’ll get 4.5mm higher at the ball joint. How this relates to turns of the hilo would depend on the thread pitch of your specific hilo

Personally I like my mini a bit taller so that it don’t scrape on driveways and speed bumps, so I have mine set approximately an inch between the bumpstop and the top arm. The driveshaft is then approximately horizontal (or the inner edge slightly higher) and the rear suspension 1-2cm higher

_________________
Image


Top
 Profile  
 
 Post subject: Re: Adjusting HiLo’s
PostPosted: Thu Jul 06, 2023 4:39 pm 
Offline
848cc
848cc

Joined: Fri Jan 04, 2019 10:24 am
Posts: 321
Location: Western Victoria
JB,

I've got the Minispares Hilos and have found that 1 full turn of the bolt gives about 20mm of lift on the front and about 23mm or so on the rear.

However, I've found that the cones all vary and I don't get the same lift on every corner so there's a bit of mucking around to get the car sitting level side to side. I also measure the front when we're sitting in it as it drops with the extra weight. If a solo driver, you might want the drivers side a bit higher than passenger at rest so it's level when you're on the road.

I mark one side (or hex edge) of the adjusting nut with texta so I know how far I'm winding the bolt. Sometimes, I just need say 1 complete turn and then a couple of sides of the bolt as well. The texta mark helps me remember how many turns I've made. I wipe off the texta when I'm done so there's no marks for future adjustment.

Like Timmy, my driveshafts are about level with driver and passenger on board. I can't remember the gap in the bump stops sorry.

Cheers, Rocky


Top
 Profile  
 
 Post subject: Re: Adjusting HiLo’s
PostPosted: Thu Jul 06, 2023 9:08 pm 
Offline
848cc
848cc

Joined: Mon Apr 25, 2022 6:38 pm
Posts: 73
Thanks Timmy and Rocky that’s exactly what I needed to know. I can ahead and adjust them now :D


Top
 Profile  
 
 Post subject: Re: Adjusting HiLo’s
PostPosted: Thu Jul 06, 2023 10:48 pm 
Offline
998cc
998cc
User avatar

Joined: Fri Oct 18, 2019 5:11 pm
Posts: 601
Location: Brisbane Northside
For the suspension height I use the hydro values, there is no rubber cone values as from the factory there was no adjustment.
Attachment:
image_2023-07-06_224354868.png

Attachment:
image_2023-07-06_224507023.png


Technically the alignment should be redone when the height is adjusted.


You do not have the required permissions to view the files attached to this post.

_________________
1986 Mayfair (998 auto), 1974 S, 1974 Van, 1972 PMG Van

Too many minis


Top
 Profile  
 
 Post subject: Re: Adjusting HiLo’s
PostPosted: Sat Jul 08, 2023 3:37 pm 
Offline
998cc
998cc

Joined: Fri Apr 01, 2011 8:33 pm
Posts: 1192
I seem to remember that the front and back ratios are different. It's been a loooong time since I adjusted mine but I have a feeling that raising the Hi-Los 1mm raises the front end by 3mm and the rear by 5mm.

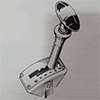
This piqued my interest so I had a look in the shed and found the box that my replacement ("New Improved" - according to Mr Ripp) Hi-Los came in. I bought these in the early 90s to replace the original ones that needed a hole drilled in the rear valance to fit the adjuster key.

According to the enclosed instruction sheet, these have a total "travel" of 45mm which will ("theoretically" :) raise the front 135mm and the rear 225mm. Some handwritten notes (that I probably made at the time) inside the box lid indicate that 3 turns increases the Hi-Lo length by 3/10" and 4 turns = 4/10ths. And six flats equal one turn.

Cheers, Ian


Top
 Profile  
 
 Post subject: Re: Adjusting HiLo’s
PostPosted: Sun Jul 09, 2023 8:22 am 
Offline
religious status
religious status
User avatar

Joined: Fri Mar 19, 2004 6:19 pm
Posts: 39751
Location: near Baulkham Hills, NSW
Rule of thumb when we used to shorten the trumpets in the 60s was 1mm dropped the front by 3mm and the rear by 5. If that helps...

_________________
DrMini- 1970 wasaMatic 1360, Mk1S crank, 86.6HP (ATW) =~125 @ crank, 45 Dellorto (38 chokes), RE282 sprint cam, 1.5 rockers, 11.0:1 C/R. :mrgreen:


Top
 Profile  
 
Display posts from previous:  Sort by  
Post new topic Reply to topic  [ 7 posts ] 

All times are UTC + 10 hours


Who is online

Users browsing this forum: No registered users and 84 guests


You cannot post new topics in this forum
You cannot reply to topics in this forum
You cannot edit your posts in this forum
You cannot delete your posts in this forum
You cannot post attachments in this forum

Jump to:  

© 2016 Ausmini. All garage work involves equal measures of enthusiasm, ingenuity and a fair degree of irresponsibility.