Ausmini
It is currently Wed Apr 16, 2025 9:43 pm

All times are UTC + 10 hours


Post new topic Reply to topic  [ 11 posts ] 
Author Message
 Post subject: Flare Backings
PostPosted: Mon Mar 23, 2015 9:52 am 
Offline
998cc
998cc
User avatar

Joined: Tue Sep 10, 2013 3:21 pm
Posts: 978
Location: St. George Area, New South Wales
I have reserved a set of clubman flares from J.S. for when they come in, I have also ordered the backings and new side pinchweld/moulding.

I have a few questions.

1.) The flares are to be attached by spot welds (going to get this bit done when they paint the flares, and do a few touch ups) Are the spot welds enough, should there be a little something something between the flare and the body seam to avoid water gathering in the gap??

2.) a previous owner has or has had the existing molding riveted in place, these should be filled with a plug weld?

3.) When the flares are attached with the molding, is there a gasket/rubber backing between the flare and the fender to stop water getting in as in question 1?

Thanks a bunch guys, appreciate any notes.

_________________
Nick
Image
http://www.ausmini.com/forums/viewtopic.php?f=3&t=86675


Top
 Profile  
 
 Post subject: Re: Flare Backings
PostPosted: Mon Mar 23, 2015 10:54 am 
Offline
1098cc
1098cc
User avatar

Joined: Mon Sep 12, 2005 11:48 pm
Posts: 1842
Location: Hobart, Tasmania
1) Backing plates can be spotwelded on, but pop rivets or small self tappers work OK too. nothing goes between the flare and the body. You could put a squirt of sikaflex or seam sealer in between the backing plate and flange if you are using screws or rivets.
2) If you like, but you can't see the holes so it doesn't really matter.
3) As per answer 1

_________________
1951 Morris Commercial J Type Van
1955 BSA C11G
1961 Morris Mini Traveller
1969 Triumph TR6R
1977 Leyland Moke Californian


Top
 Profile  
 
 Post subject: Re: Flare Backings
PostPosted: Mon Mar 23, 2015 11:29 am 
Offline
998cc
998cc
User avatar

Joined: Tue Sep 10, 2013 3:21 pm
Posts: 978
Location: St. George Area, New South Wales
Cool thanks, I may get the sika in there regardless, I am wanting to stay away from the rivets to avoid corrosion between the dissimilar metals. the process should be,

Remove existing seam molding, clean up seam (rust remove+ plug weld and sand), sika and spot weld on new seam, paint backings and other touchups as well as flares, attach flares and seam molding with perhaps some sika/seam sealer here as well I will talk to the man doing the work to see what he thinks as well.

thanks again for the info.

_________________
Nick
Image
http://www.ausmini.com/forums/viewtopic.php?f=3&t=86675


Top
 Profile  
 
 Post subject: Re: Flare Backings
PostPosted: Mon Mar 23, 2015 8:18 pm 
Offline
1275cc
1275cc

Joined: Sat Feb 09, 2013 5:44 pm
Posts: 2223
Location: Camden
I have a Mk I that I put flairs on many years ago. The support strips were painted first and pop-riveted so the car could be returned to original, and there were no rust problems with the rivets when I repainted the car.
You don't need sealer between the the flair and the guard panel or between the flair and its support strip - there is no sealer on factory models.


Top
 Profile  
 
 Post subject: Re: Flare Backings
PostPosted: Mon Mar 23, 2015 9:32 pm 
Offline
998cc
998cc
User avatar

Joined: Tue Sep 10, 2013 3:21 pm
Posts: 978
Location: St. George Area, New South Wales
Understandable for a Mk1, but a 998 clubman barebones model that has already had a disk break conversion, and a few other bits and bobs, I am not too concerned with the roll back.

_________________
Nick
Image
http://www.ausmini.com/forums/viewtopic.php?f=3&t=86675


Top
 Profile  
 
 Post subject: Re: Flare Backings
PostPosted: Tue Mar 24, 2015 8:54 am 
Offline
SooperDooperMiniCooper ExpertEngineering
User avatar

Joined: Fri Apr 29, 2005 9:46 am
Posts: 18885
Location: Under the bonnet son!
The spot welds are a nice way of doing it. You can tack the flare support in position with a light squeeze of the spot welder, and wriggle it off if you don't like the outcome. This gives you time to offer up the flare and have a good look at how it fits.

The flare kits were originally designed to have plastic clips attached to the guards for the flare to slot into, and if you get them off J.S. (he was selling them as well NOS) they look like just the ticket, if you don't mind drilling your guard to fit them. There are purposefully notches in back of the flare to catch the clips as they slide over the top.

The minis didn't use them (in any model with flares I think, including Clubman S through to 1275LS) for reasons I don't know. Maybe production reasons (efficiency, cost) perhaps?

_________________
SooperDooperMiniCooperExpertEngineering

All garage work involves equal measures of enthusiasm, ingenuity and a fair degree of irresponsibility.


Top
 Profile  
 
 Post subject: Re: Flare Backings
PostPosted: Tue Mar 24, 2015 10:12 am 
Offline
998cc
998cc
User avatar

Joined: Tue Sep 10, 2013 3:21 pm
Posts: 978
Location: St. George Area, New South Wales
The quick conversation I had with John was that the seam molding should be used to attach the flares first, and add clips as the molding pulls away or in any parts where it doesn't hold on properly, if they don't work fiddle it and you shouldn't need the rivets.

I will have a longer chat when he calls to confirm the order.

_________________
Nick
Image
http://www.ausmini.com/forums/viewtopic.php?f=3&t=86675


Top
 Profile  
 
 Post subject: Re: Flare Backings
PostPosted: Tue Mar 24, 2015 11:10 am 
Offline
1275cc
1275cc

Joined: Sat Feb 09, 2013 5:44 pm
Posts: 2223
Location: Camden
My main point was that pop rivets work perfectly well, although spot welds are solid.
I also remember that after fitting the plastic flair over the metal strip, there were places where the edge of the metal strip protruded past the plastic edge, needing slight grinding to square-off.
Incidentally, the metal strip fits on top of the car's flanges - not under them.
As Mick said, the original kits included press buttons to hold the flair against the guard - but the factory never used them and they aren't needed as the flair stays on just with the plastic-chrome edge mould.


Top
 Profile  
 
 Post subject: Re: Flare Backings
PostPosted: Tue Mar 24, 2015 11:27 am 
Offline
998cc
998cc
User avatar

Joined: Tue Sep 10, 2013 3:21 pm
Posts: 978
Location: St. George Area, New South Wales
Thanks Bill, I did take that on board, but being a laser sailor I deal allot with dissimilar metals with rivets between the fittings and the mast. although it is being drowned weekly in salt water it doesn't take long for the sulfuric ants to set in and have some nice big holes, something I wish to avoid.

_________________
Nick
Image
http://www.ausmini.com/forums/viewtopic.php?f=3&t=86675


Top
 Profile  
 
 Post subject: Re: Flare Backings
PostPosted: Tue Mar 24, 2015 11:37 am 
Offline
1098cc
1098cc
User avatar

Joined: Mon Sep 12, 2005 11:48 pm
Posts: 1842
Location: Hobart, Tasmania
Several years ago I fitted them to a round nosed van. At the time the backing strips weren't available, but I got the flairs and fitting kit from John. From memory there was a template for the backings, but I just made mine up from some scrap galv sheet. It was very easy. When I went to fit the flares they didn't meet the edge of the backings very well, so I just went along with the angle grinder and trimmed it off.

I found that those little spring paper clip thingys that you get from a stationery supplier were really handy for temporarily holding them to the edge of the flange while I fiddled things around.

Image

I didn't use any of the body clip things because they require a fairly large hole to be drilled into the panel. They weren't necessary

Tim

_________________
1951 Morris Commercial J Type Van
1955 BSA C11G
1961 Morris Mini Traveller
1969 Triumph TR6R
1977 Leyland Moke Californian


Top
 Profile  
 
 Post subject: Re: Flare Backings
PostPosted: Tue Mar 24, 2015 11:43 am 
Offline
1360cc
1360cc
User avatar

Joined: Wed Oct 03, 2007 9:04 pm
Posts: 6737
Location: Melbourne, VIC
In case there's any confusion about the attachment methods mentioned by Mick and Hobson I thought the following might help.

The Australian flares were designed to be fitted with small mushroom-type plastic buttons that were fitted to the outside of the guards, as described by Mick. These buttons (part HYA5841) slotted into cut-outs along the inner edge of the 
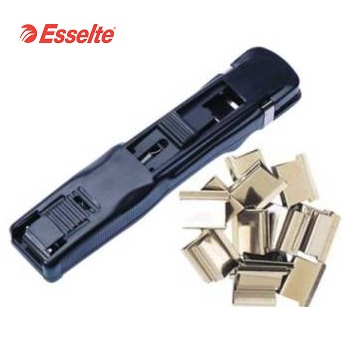
flare. Small metal clips (part MYH0045) were used to clamp the outer edge of the flare to the metal backing strip. Early on the mushroom buttons were dispensed with because the holes in the guard created a spot where rust could easily form, and the appearance without them was satisfactory.

The mushroom buttons and fastening screws, plus the edge clips all come in a pack - part HYL6427 (picture below). Mini Kingdom has NOS kits. Be aware that the flares now being made no longer have the cut-outs so they will need to be modified if the button method is used.

Also below are the fitting instructions that came with flare accessory kits. HYL3937 is the standard flare kit (as per Cooper S). HYL3942 is the wide flare kit. JS is having the tooling for the wide flares made at the moment.

Attachment:
HYL6427.jpg
Attachment:
Flare Fitting Instructions p1.jpg
Attachment:
Flare Fitting Instructions p2.jpg


You do not have the required permissions to view the files attached to this post.

_________________
ex-NSW Police 1970 MK II Cooper S
VMCI #43


Top
 Profile  
 
Display posts from previous:  Sort by  
Post new topic Reply to topic  [ 11 posts ] 

All times are UTC + 10 hours


Who is online

Users browsing this forum: No registered users and 77 guests


You cannot post new topics in this forum
You cannot reply to topics in this forum
You cannot edit your posts in this forum
You cannot delete your posts in this forum
You cannot post attachments in this forum

Jump to:  

© 2016 Ausmini. All garage work involves equal measures of enthusiasm, ingenuity and a fair degree of irresponsibility.